Anime Archives

Disclosure: "As an Amazon Associate I earn from qualifying purchases." Read more

Dissidia Final Fantasy: Opera Omnia Cloud Strife Spheres Guide and Plans

Saturday, April 30, 2022

Chronological order? What chronological order? Sigh. Honestly, I’d love to start from the beginning, but if I do that, I’ll probably end up not being able to post here for a long time again. Like I said in this post, I’m trying to go through my backlog of drafts and notes so I could turn them all into proper articles and post them already as soon as possible.

So I’ll talk about when I started playing the Dissidia Final Fantasy: Opera Omnia mobile game in another post. It was definitely a while ago though. Yeah, I have all sorts of notes and drafts for various topics, and a lot of them are from several months ago. 

My backlog of drafts and notes is no joke. Being able to post this one is hardly going to make a dent in said backlog. But it’s a start. And, hopefully, I can post many more to at least decrease the number even if it’s just little by little.

Favorite Final Fantasy Character

Anyway, back to the actual topic of this post - Cloud Strife from Final Fantasy VII (#ad) is one of my favorite characters in DFFOO. Not number 1 though. Currently, that title goes to Zack Fair. I’d say Cloud is more number 2 at the moment. Actually, now that I think about it, he’s consistently been number 2, so far. But, again, not the actual topic of this post, so let’s talk about that some other time.

Sphere System in DFFOO

However, there is a reason I started by saying I like Cloud. It’s because spheres aren’t really required in this game. They’re more of a luxury, and they’re a one-time use. You can’t get them back after giving them to a character. You could overwrite the sphere if you want to give the character a new one, but that still means the original sphere will be lost. Which is why the ideal thing to do is to either hoard them, or give them to your faves, or at least someone you’re likely to use as often as possible.

Well, for me, Cloud is a fave in this game, and I try to use him whenever I can, so I wanted to give him spheres.

Cloud Sphere Slots

Cloud can equip A (Attack), D (Support), and E (Jamming) spheres.

I actually looked through a list of currently available spheres to see which ones I could possibly give to Cloud.

A Spheres for Cloud

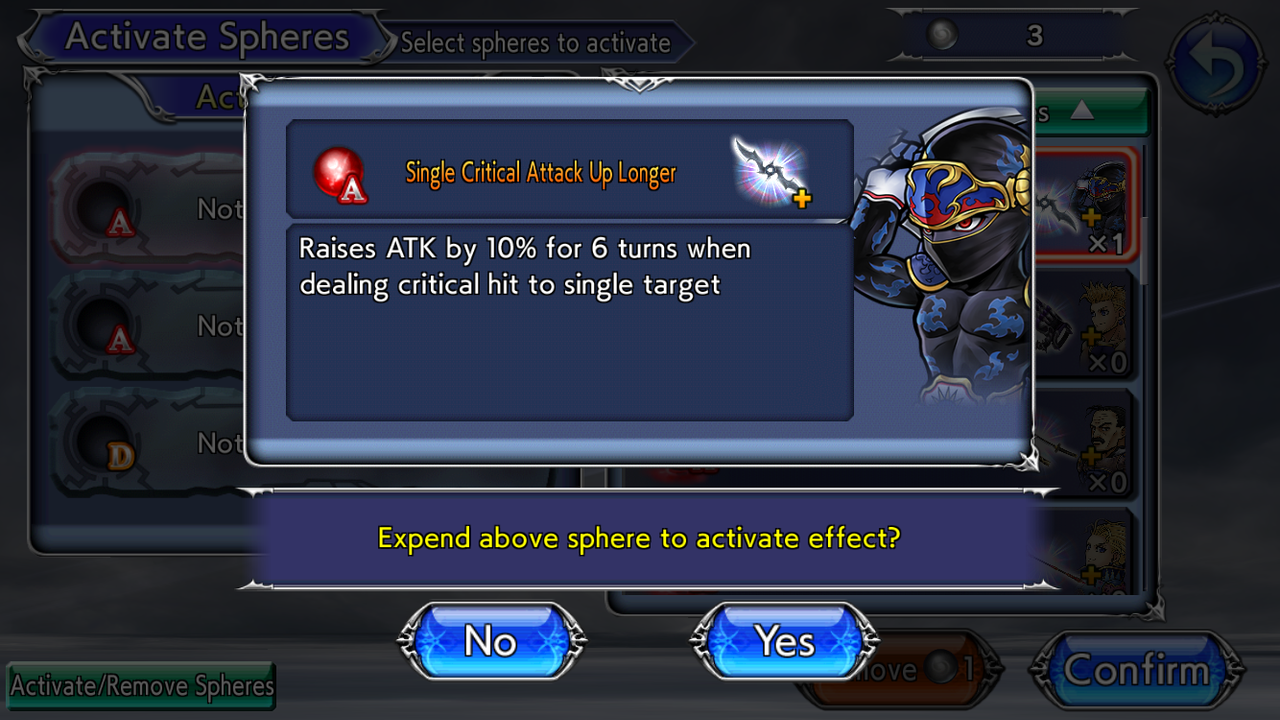
I thought Cloud should equip either an attack up (like Tifa Lockhart’s (from Final Fantasy VII) Critical Attack Long, which raises attack by 10% for 6 turns when dealing a critical hit) or max brave up (like Ace’s (from Final Fantasy Type-0) Break Hit Boost Long, which raises max brave by 10% for 6 turns when breaking target or attacking a broken target) sphere. 

In the end, I gave Agrias Oaks’s (from Final Fantasy Tactics) Full HP Boost A sphere to Cloud. It raises his max brave by 10% when his HP is max.

Would I have been better off giving him an attack up A sphere instead? I don’t know. I do know that I like seeing him get such a high max brave (I farmed him triple attack 108 and max brave 330 artifacts, too. Yeah, I like him enough to go through such trouble, and it was definitely a lot of trouble. Took days of farming before I could get those artifacts for him) even when he’s not one of the synergy characters. Besides, I feel he already hits hard enough anyway.

Do I regret giving him Agrias’ sphere? Well, really, there’s no point regretting it since it’s done already, and I can’t change what has already been done. I mean, I could give him another A sphere, but that would mean losing Agrias’ sphere, and I’d rather not do that. Besides, I think the sphere works well enough on him anyway. Or is that just me trying to justify what I’ve done? Honestly, I don’t know.

So far, the only issue I’ve really encountered with this sphere is with the “when HP is max part”. Cloud has no way of healing himself. So when an enemy decides to deal an HP attack and he gets hit, then he’ll lose the effect of Agrias’ sphere. And he won’t be able to get it back until the party’s healer can bring him back to full health.

From my experience, that usually only lasts for like 1 or 2 turns. Plus, enemies don’t HP attack every turn. So, for the most part, I have no problems keeping the effect of Agrias’ sphere active for Cloud. 

If it meant not losing Agrias’ sphere, would I give Cloud a different sphere? Hmm, that’s actually a hard question. Cloud has had this sphere ever since I purpled Agrias, which was during the time her Ex showed up on a banner alongside Faris’. That seems like forever ago. 

I think I got way too used to Cloud having this sphere. So I don’t know if I want to change it and give him something else. Maybe if I feel like he’s not dealing enough damage anymore, I might want to give him an attack up sphere instead. But, for now, I think he’s still doing pretty well with this sphere. 

E Spheres for Cloud

Yeah, the D sphere slot should have been next, but there’s a reason I’m starting with the E slot instead. That reason is because Cloud already has an E sphere, but he still has no D sphere.

There’s a lot of E spheres, but I feel that a lot of them aren’t really a good fit for Cloud.

Let’s take the Emperor’s Debuff Success Attack Long sphere, for instance. It raises attack by 10% for 6 turns after inflicting a debuff. The only way for Cloud to inflict a debuff is for him to paralyze an enemy. 

But you only get a guaranteed paralyze after using his second skill, Finishing Touch. The rest of the time, it’s up to RNG whether you can paralyze an enemy with Cross Slash. 

The sphere’s effect does last for 6 turns, but I still feel it’s a bit too unreliable and that something like this would be better on another character, particularly ones who can easily inflict debuffs with most, if not all, of their skills, so the sphere can be active all the time.  

I considered giving him spheres like: 

  • Vincent’s Full HP Critical Attack Down - inflict 30% attack down for 6 turns when HP is max and a critical hit occurs
  • Fran’s Full HP Break Hit Boost Down - inflict 30% max brave down for 6 turns when HP is max and breaking target or attacking a broken target  
  • Ultimecia’s Full HP Critical Guard Down - inflict 30% defense down for 6 turns when HP is max and a critical hit occurs
  • Setzer’s Full HP Critical Speed Down - inflict 20% speed down for 6 turns when HP is max and a critical hit occurs
  • Tidus’ Full HP Break Hit Speed Down - inflict 20% speed down for 6 turns when HP is max and breaking a target or attacking a broken target

to give him even more utility. 

But I couldn’t quite decide which one would be best for him. Perhaps the speed down ones were the best since he could be quite slow.

In the end, I decided to give him Faris’ Full HP Critical Poison All sphere, which lowers enemy brave by 30% of their initial brave at the start of their turn for 6 turns when HP is max and a critical hit occurs.

This sphere’s poison is invisible, meaning you won’t see it as a debuff on the enemy. It also poisons all the enemies in a wave even if Cloud only uses his Cross Slash, Finishing Touch, Critical Crush, or HP+.

30% of an enemy’s initial brave really isn’t that much, but it still pleases me to see the poison effect happening anyway. And I like how all the enemies are poisoned even if Cloud only attacks one of them.

So, would I have been better off giving him the other spheres I’ve been considering like Setzer’s or Ultimecia’s? Well, I don’t know about that. I do know that all those other spheres inflict a visible debuff on the enemy, so they could conflict with other characters who already give those debuffs. Or those other characters could inflict a higher version of a debuff, which would overwrite the sphere’s weaker version.

Do I regret giving Faris’ sphere to Cloud? Nope. When I was looking through the list of available E spheres and trying to decide which one was best to give to Cloud, Faris’ sphere was the one that really caught my attention. 

Admittedly, I had the notion that the 30% poison would be a lot more, but, well, the same could be said for the other spheres anyway. The fact is they’re really not necessary for anyone to have. They just give some added utility, which is good and which was what I really wanted for Cloud anyway. 

Just like with Agrias’ sphere, the only issue I’ve really encountered with this one is with the “when HP is max” part. So, just like with Agrias’ sphere, I’d need to wait 1 or 2 turns for the party’s healer to get Cloud back to max HP so he can get back to poisoning the enemies again. But the sphere’s effect lasts for 6 turns, so it’s really not much of an issue at all.

If it meant not losing Faris’ sphere, would I give Cloud a different sphere? Hmm, well, I just looked through the list of currently available E spheres (there were a number of new ones added since I last checked), and I’m not really seeing anything that seems to be better than Faris’. I think I’ll be sticking with this one for Cloud.

D Spheres for Cloud

Like I said, I don’t have a D sphere for Cloud yet although I’m hoping to be able to give him one soon, so I can finally complete all his sphere slots. 

There’s a lot of D spheres, but a lot aren’t good for Cloud at all, particularly the ones that require the user to “grant a buff”. Cloud doesn’t grant any buffs, so those kinds of spheres are automatically out of the question for him.

Here are the list of D spheres that I’m considering for him:

  • Sazh’s Critical Attack All Long - raises party’s attack by 5% for 6 turns when dealing a critical hit

5% attack isn’t that much, but it’s for the entire party, and it seems to be the norm for D spheres anyway. Cloud has no trouble dealing critical hits, so he should have no problems keeping this sphere active. Of course, the problem is that I would have to pull for Sazh’s Ex, and I’m not sure yet if I want to purple him as I haven’t even taken the time to really look at his updated kit.

  • Wakka’s Buff Attack Boost All 5 - raises party attack and max brave by 5% when 5 or more buffs are active

If I’m understanding this correctly, the “5 or more active buffs” refers to the entire party, so as long as there are 5 or more buffs, this sphere’s effect should activate. Besides, Cloud himself already gets a lot of buffs, so it should be easy enough for him to use this sphere. Plus, even if the increase is only 5%, this one actually raises both attack and max brave, which is great. It doesn’t even have a turn duration, meaning it will last as long as there are 5 or more buffs.

Just like with Sazh though, I would have to pull for Wakka’s Ex. Apart from not being sure if I want to use scarce ingots to purple him (assuming I even get his Ex in the first place), his Ex shows up with Aerith’s, if I’m remembering correctly. The problem here is that I already have Aerith’s Ex, so I can’t really justify using gems on this banner. Knowing my luck, I’d just end up with Aerith’s entire kit even though I already have her fully MLB.

  • Ramza’s Buff Base Boost All 3 - raises party initial brave and max brave by 5% when 3 or more buffs are active

It’s similar to Wakka’s sphere, but this one only requires 3 or more active buffs. This one also increases the party’s initial brave and max brave as opposed to attack and max brave. Is it better to raise initial brave or attack? I guess attack would be better. 

But there’s nothing wrong with raising initial brave. For instance, Zack will certainly benefit from an increase in initial brave since his Ex’s barrier shield is based off his initial brave.

At the moment, I’m leaning towards this sphere, primarily because I already have Ramza’s Ex, so at least I don’t need to pull for it. I do need to MLB it though.

  • Cait Sith’s Buff Boost All 3 - raises party max brave by 5% when 3 or more buffs are active

This is similar to Ramza’s sphere, but this one only raises one stat. This is another option for Cloud, like in case I decide not to purple Ramza’s sphere or something, because I already have Cait’s Ex. Ended up with like 3 copies of this thing while trying (and failing) to pull for Balthier’s Ex.

Currently, I have Cait at Ex+ 0/3. But I don’t have any plans of purpling him anytime soon, especially since I managed to lock him on to Dimensions’ End Entropy Tier 5 in his current state. At the moment, I have a lot of other supports to use, so it’s not like I really need him for anything.

  • Deuce’s Buff Attack Up All 3 - raises party attack by 5% when 3 or more buffs are active

This is basically Cait’s sphere except this one raises attack instead of max brave. This is another option for Cloud, but I probably won’t be giving this to him unless we somehow get a surplus of ingots.

I have Deuce’s Ex, but I haven’t even given her a book. It’s unfortunate, but she’s already been outclassed by the likes of Rosa and Y’shtola especially since she can’t even heal. At least Cait can heal, and he is a physical support, so he can see some use in fights where magic is heavily resisted.

  • Barret’s Break Hit Boost All Long - raise party max brave by 5% for 6 turns when breaking target or attacking a broken target

This is basically Cait’s sphere except with a different condition for activation. 

I don’t have Barret’s Ex. Well, I didn’t pull on his banner with Tifa since I already had Tifa’s Ex. And I don’t know if his Ex will ever show up again. 

Even if it does, I don’t think I’d want to pull for it since, like I said, this is basically Cait’s sphere, and I already have his Ex, so I don’t really need this.

  • Freya’s HP Up All - raise party's Max HP by 10%

I don’t know if it’d be better to raise the party’s HP (well, I did get Leviathan’s Life Up passive from the Leviathan Summon Board) as opposed to raising stats like attack and max brave instead. I mean, of course, it’d be good to raise all the stats, but if I had to choose, I don’t know which one to go for.

I guess there’d be plenty of time to think about this since Freya’s Ex hasn’t even shown up yet. Then again, there’s no guarantee I’d get it unless I decide to pity it, but I haven’t decided yet if I want to do that. We’ll see, I guess.

  •  Lyse’s Break Hit Attack All Long - raise party’s attack by 5% for 6 turns when breaking target or attacking a broken target

This is basically Deuce’s sphere, but with a different activation condition. I don’t have Lyse’s Ex. I didn’t pull for it when it showed up since I already had Y’shtola fully MLB. 

Since it’s so similar to Deuce’s sphere, and I already have Deuce’s Ex, I don’t think I’d bother pulling for this even if it shows up in a future banner.

  • Beatrix’s Critical Boost All Long - raise party max brave by 5% for 6 turns when dealing a critical hit

I already have Beatrix’s Ex, and I’m considering purpling (need more ingots!) her, so this is another possible sphere for Cloud.

Hmm, so if I had access to all these spheres and ingots aren’t an issue at all, then it would be a choice between the following:

  • Wakka - since he can raise 2 stats, attack and max brave
  • Ramza - since he can raise 2 stats, initial brave and max brave
  • Freya - max HP up seems pretty good, too
  • Sazh - for attack up. He shows up later than Lyse and Deuce, so he might be better than those 2 although I’d definitely need to take a closer look at his kit to know for sure
  • Beatrix - for max brave up. I’m pretty sure she’s better than both Barret and Cait Sith. Or maybe I’m just being biased? LOL

Notes:

  • pics are from Amazon.com; link shown above
  • screenshots are from my Dissidia Final Fantasy: Opera Omnia game account
  • originally published on my main Tumblr blog on Feb 29th, 2020 11:29:58pm

Dissidia Final Fantasy: Opera Omnia Lufenia Quests with Cloud Strife and Sephiroth

Thursday, April 28, 2022

Lufenia Quests are currently the hardest kind of fight in the Dissidia Final Fantasy: Opera Omnia (DFFOO) mobile game. They’re level 200. Aside from the usual gems and tickets, winning will give you 20 High Guard Tokens, which can be used to buy High Armor.

The battles featured in this post include either Cloud Strife (from Final Fantasy VII) or Sephiroth (from Final Fantasy VII) as part of the team lineup.

Lufenia Quests Table of Contents

The Lufenia fights featured in this post are the following:

  1. The Terse Turk
  2. Mechanized Sentry (Guard Scorpion Raid)
  3. Roses of May
  4. Thrall of Darkness
  5. Storming the Citadel (Mission Dungeon)
  6. Tree for the Void

Introduction

After I ended up having to pity the Burst or BT weapons of both Cloud and Sephiroth, I wanted to use them as much as possible, especially in Lufenia fights.

I talk more about this in another post, but it was a back-to-back pity. Spent a total of 240,000 gems. It would have been more if their banners didn’t come with a free multi-draw as part of the game’s winter holidays celebration.

Cloud Strife from Final Fantasy VII

My Cloud is Level 80 and Crystal Level 80. His 15cp, 35cp, Manikin weapon, World of Illusions weapon, Ex, and LD are fully MLB. His Ex is at Ex+ 3/3 or Purple. He’s currently equipped with his Burst weapon and his High Armor. All of his Boards have been completed. He has his Bloom Stone.

He has 3 Attack 108 with Max Brave 330 Artifacts and

3 Attack 108 with Debuff Attack Up★★ (Raises ATK by 5% when an enemy is debuffed) Artifacts.

My plan was to equip Cloud with triple 108/Debuff Attack Up★★ whenever I have him in a party with chars who are able to constantly inflict a lot of debuffs. However, I usually just end up equipping him with triple 108/330 anyway.

Cloud is equipped with the following Spheres:

  • Tifa Lockhart’s (from Final Fantasy VII) Critical Attack Up Longer A Sphere

Raises ATK by 10% for 6 turns when dealing critical hit

  • Sazh Katzroy’s (from Final Fantasy XIII) Critical Attack All Longer D Sphere

When dealing critical hit:
• Raises party’s ATK by 5% for 6 turns

  • Faris Scherwiz’s (Sarisa Scherwil Tycoon from Final Fantasy V) Full HP Critical Poison All E Sphere

Grants effect for 6 turns that reduces enemy’s BRV by 30% of individual INT BRV at start of enemy’s turn when dealing critical hit while HP at MAX
*Does not stack with same sphere

Sephiroth from Final Fantasy VII

My Sephiroth is Level 80 and Crystal Level 80. His 15cp, 35cp, Ex, and LD are fully MLB. His Ex is at Ex+ 3/3 or Purple. He’s currently equipped with his Burst weapon and his High Armor. All of his Boards have been completed. He has his Bloom Stone.

He has 3 Attack 108 with Max Brave 330 Artifacts and

3 Attack 108 with One-Winged Angel Boost★★ (Raises INT BRV, MAX BRV, ATK, DEF by 5% if HP is MAX at start of last wave) Artifacts.

If the fight only has 1 wave, then I equip him with triple 108/One-Winged Angel Boost★★. Otherwise, I go for triple 108/330.

Sephiroth is equipped with the following Spheres:

  • Jecht’s (from Final Fantasy X) Critical Base Attack Up Shorter (RF) A Sphere

When dealing critical hit:
• Raises INT BRV, ATK by 4% for 3 turns

  • Jack’s (from Final Fantasy Type-0) Critical Attack Up Shorter Power A Sphere

When dealing critical hit:
• Raises BRV damage by 5%, ATK by 5% for 3 turns

  • Yuri’s (from Final Fantasy Crystal Chronicles: Ring of Fates) Full HP Attack Boost Up A Sphere

Raises own MAX BRV, ATK by 5% while HP is MAX

The Terse Turk Lufenia Quest

The The Terse Turk is the event that introduced Rude (from Final Fantasy VII) as a playable char in this game. Sephiroth's Burst was also featured on Rude's banner (this was where I ended up pitying said BT), which meant he was also synergy for all the The Terse Turk quests.

The The Terse Turk Lufenia Quest was the first Lufenia fight wherein I used Sephiroth. His team mates were Rude and Gladiolus Amicitia (from Final Fantasy XV). Both Rude and Gladio are fully MLB and Purple, including their LD. All of their Boards have been completed and they have their Bloom Stones. Gladio has triple Attack 108 with Max Brave 330 Artifacts while Rude has 1 Attack 108 with Max Brave 330 and 2 Attack 108 with Max Brave 200 Artifacts. Gladio is equipped with the following Spheres:

  • Oerba Yun Fang’s (from Final Fantasy XIII) Break Hit Attack Up Longer (RF) A Sphere

When inflicting Break or attacking target afflicted with Break:
• Raises own ATK by 4% for 6 turns    

  • Gabranth’s (Noah fon Ronsenburg from Final Fantasy XII) Critical Resist All Shorter (RF) B Sphere

After dealing critical hit:
• Reduces party’s BRV damage taken by 4% for 3 turns

  • Garnet Til Alexandros XVII’s (from Final Fantasy IX) HP Heal Attack Up Longer (RF) C Sphere

When recovering own HP:
• Self: Raises ATK by 4% for 6 turns

I talk more about this in another post, but am really very pleased to have been able to get the win with this team.

Mechanized Sentry (Guard Scorpion Raid) Lufenia Quest

The Mechanized Sentry (Guard Scorpion Raid) is the event that came with the introduction of Cloud’s LD and Burst. The second banner of this event was where I ended up pitying Cloud’s BT.

The Mechanized Sentry (Guard Scorpion Raid) Lufenia Quest is the first time I used Cloud in a Lufenia fight. This is Sephiroth’s second Lufenia battle. I brought Rude as my third char because the enemies here loved to HP attack. Rude heals, he batteries, and he even provides some good auras and buffs for the party.

I talk more about this in another post, but I’m super pleased that I was able to get the win by using both Sephiroth and Cloud in the same team. Even managed to bring in Rude for a full Final Fantasy VII (#ad) party.

Roses of May Lufenia Quest

The Roses of May is Beatrix’s (from Final Fantasy IX) Lost Chapter event. For the Lufenia Quest of this event, I saw a lot of clears that featured Cloud, but the only one with Sephiroth that I saw also included Beatrix. I couldn’t find any clears that included both Seph and Cloud in the same team. Since this is Beatrix’s event, she has synergy stats, but I couldn’t use her because I didn’t have any more resources to spare to pull for her LD.

After reading more info about this fight as well as watching a few vids, I decided to try it with a team comprised of Cloud, Sephiroth, and Lightning (Claire Farron from Final Fantasy XIII).

My Lightning is Level 80 and Crystal Level 80. Her 15cp, 35cp, Manikin weapon, Ex, and LD are fully MLB. Her Ex is at Ex+ 3/3 or Purple. She’s currently equipped with her Burst weapon and her High Armor. All of her Boards have been completed. She has her Bloom Stone.

She has triple Attack 108 with Max Brave 330 and triple Attack 108 with Initial Brave 170 Artifacts.

Lightning is equipped with the following Spheres:

  • Prishe’s (from Final Fantasy XI) Weak Attack Boost Up Shorter A Sphere

When attacking target’s weakness:
• Raises own MAX BRV, ATK by 10% for 3 turns
*Does not stack with same sphere

  • Ardyn Izunia’s (Ardyn Lucis Caelum from Final Fantasy XV) Break Raging Attack Boost Up A Sphere

When inflicting Break:
• Raises MAX BRV, ATK by 2% up to 5 times, once per turn
*Does not stack with same sphere

  • Hope Estheim’s (from Final Fantasy XIII) Buff Success Attack Boost All Shorter D Sphere

After granting buff:
• Raises party’s MAX BRV, ATK by 5% for 3 turns
*Does not stack with same sphere

Anyway, for this fight, I brought Penelo’s (from Final Fantasy XII) and Rude’s Calls for healing, in case things go wrong, as well as Reno’s (from Final Fantasy VII) for the debuffs. I chose Ifrit as my Summon because ideally, the bosses shouldn’t be getting any turns. I borrowed a friend support Amidatelion (from Final Fantasy Crystal Chronicles: The Crystal Bearers) for their ability to delete the turns of all enemies.

Right after Lightning's first move, I switched her out for the friend Amidatelion to delay the bosses as much as possible.

Cloud was so slow and his Ex charges fast so there were no issues with just spamming his skills every time he actually got a turn. What worried me was when the orbs were there and he needed to be able to move to dispel, but he was so freaking slow and Lightning just kept taking all the turns. His dispel and turn delay via LD helped a lot though. He also dealt lots of damage whenever he actually got the chance to move.

Sephiroth was... there. His damage was pretty meh. I guess the debuff from Scintilla and his speed down aura helped a bit. I mostly spammed his moves too although I used the occasional HP++, particularly when his Ex gauge was nearly full. Probably wouldn't have mattered much if I spammed his skills more though. He was faster than Cloud once he was at max Jenova stacks. Would have been better if Cloud was faster though so he could dispel more.

Lightning was the star of this team. She did most of the damage. She also took most of the turns so I had to use her HP++ a few times so as not to run out of skills. Also had to be super careful with her, particularly when the orbs were up because she just takes so many turns in a row, which causes the orbs to tick down, so it was necessary for Cloud to also be able to move to increase the count. Ended up having to summon Ifrit when one orb was at 1 because Cloud wasn't set to be able to move anytime soon.

The bosses only managed to take 2 turns. The first time - the boss got to move freely. I was debating Summoning to prevent her from moving, but I thought, surely it wouldn't be so bad since this would be her first turn since the fight started. So I let her have a turn. It was bad. She dealt so much brave damage that Lightning nearly got broken. As if that wasn't enough, she followed that up with an HP attack that nearly killed Lightning. Had Seph use Penelo's Call as soon as he could move. Since Lightning took so many turns, she was back to full HP before Penelo's Call effect ended.

The second time the boss got to move, I only let it happen because she was currently paralyzed. But - argh! She healed herself for like 250k. Eff! After that, I decided not to let them move anymore, especially if they weren't paralyzed.

Was debating which Burst to use - Cloud’s or Lightning’s. Didn't bother considering Sephiroth's because I didn't think his damage would be enough. Went with Cloud because both orb counts were low already, and I worried Lightning would take more turns after Burst.

Lightning and Seph didn't deal that much damage in the launches during Cloud's Burst mode due to not having any battery, and I had to brave attack for a few of the launches just to get more brave. So I opted to use Cross Slash+ instead of another Finishing Touch. Another Finishing Touch before Burst mode ended gave Cloud the option to use another Cross Slash+ after his Burst. Cloud managed to dispel all the buffs by the time his Burst mode ended so I really needed to finish the fight soon. Was also running out of turns for the turn count requirement.

Thankfully managed to win and get all the mission requirements.

Sephiroth was the one who dealt the killing blow on the last remaining boss.

Really glad I was able to make this team work.

Thrall of Darkness Lufenia Quest

The Thrall of Darkness is Xande’s (from Final Fantasy III) event. I was rather worried about the Lufenia Quest of this event because you needed dark damage in order to increase the count of the Lufenia orbs. The problem was that I didn’t have any dark chars built. 

Xande would have been perfect since this is his event, so he even has synergy stats. He’s also apparently the only char (so far, at least) who can Imperil enemies and Enchant the party with the dark element. So he would have been a great addition to my roster. Actually, my plan had been to pull on the Thrall of Darkness banner. Aside from all of Xande’s weapons, Cloud’s Burst was also featured there. 

Unfortunately, what happened was that I ended up pitying Cloud’s Burst on one of the banners that also featured his LD. So now I didn’t have any more resources to spare for Xande, especially since I followed that Cloud pity with another pity on the banner with Sephiroth’s Burst.

So I’ve been looking up vids and info about this Lufenia Quest, and thankfully, it looks like it’s possible to win without using a dark char. But aside from not having any dark char, I also wanted to use both Cloud and Sephiroth for this fight. I wasn’t able to find a vid featuring those 2 together, so I had to come up with my own team comp.

For this Lufenia Quest, I found myself trying Cloud, Lightning, and Sephiroth again. Well, since it worked so well last time on Beatrix’s Lufenia Quest, I was hoping that it would work just as well for this fight too.

For my Summon, I had no choice but to bring Diabolos for his dark damage so I had some way of dealing with the orbs. For Calls, I found myself bringing Rude’s and Penelo’s again for healing, just in case, and Reno’s for the debuffs. For my friend support, I was debating between Vivi Ornitier (from Final Fantasy IX) for more orb control and Cloud with LD and Burst for more damage. In the end, I decided to try with Vivi first.      

The Thrall of Darkness Lufenia Quest has 2 waves. For the first wave, I spammed Cloud’s and Sephiroth’s skills. I used Lightning’s skills sparingly though, mostly using her HP+ unless it was a free skill. Used 1 Cloud LD, 2 Seph LD, and 0 Light LD. Lightning and Cloud only attacked the main boss. I had Sephiroth deal with the add-ons if they needed to be broken.  

For the second wave, I had to reset once because I let one enemy attack. Things were actually going well although it was pretty nerve-wracking trying to hurry and get the enemies to below 80% to get rid of the orb. Managed it, but the red aura was annoying me because it was wasting my delays unless it was via break. 

The in-game info didn't mention anything about how to get rid of them, so I thought letting them attack while paralyzed might be the way, but that didn't work. Maybe actually letting them attack might get the aura to disappear. I thought, how bad could one attack be? And I did have Rude’s and Penelo’s Calls for healing. So I let them attack. Big, big mistake. The attack killed Sephiroth and Lightning. Cloud survived, probably because of synergy stats. Note to self: find more info about the fight first before trying it.

So I reset and resolved never to let the enemies get a turn unless they were paralyzed. Like before, I managed to get the enemies below 80% to get rid of the orbs. A few turns after the orbs appeared for the second time, I switched out Sephiroth for the friend support Vivi that I borrowed. 

I actually debated using Seph’s Burst just for the effect to help with delaying the enemies, but I didn't think the damage would be enough. Cloud moved right after Vivi so I had him use his Burst already because the enemies were moving after him. I didn't want to summon yet since Vivi was still there to help with the orbs. However, I did end up summoning a few turns after Cloud's Burst mode ended even though Vivi was still there since by then, the enemies were nearly dead anyway.

Vivi helped with the orbs. His damage was okay enough. With him there, I didn't have to worry about the orbs. I ended up worrying more about the health of my party. I had Lightning use Rude's Call, but it wasn't enough. Too bad I had Sephiroth equip Penelo's Call. Should have given it to Cloud instead. It didn't really matter though as long as the enemies didn't attack or were currently paralyzed if they did get a turn.

Lightning was really, really good, as always. Her being able to rebreak helped a lot when the enemies had the red aura since that was the only way to delay them. She dealt so much damage and took all the turns. Had to use her HP+ a few times so she won't run out of skills so soon. She still basically ended up running out anyway. Good thing the fight was nearly over by then.

Sephiroth dealt decent enough damage, I guess. Would I have been better off bringing either Kurasame Susaya (from Final Fantasy Type-0) or Amidatelion instead of him? Yeah, definitely, especially since Kurasame inflicts a debuff that increases HP damage taken. Even Amidatelion provides more utility than him since they can delete the turns of enemies. But Seph did help me save from having to use Lightning's skills on the first wave since I spammed his instead. And the debuff from his LD was useful enough, I suppose?

Cloud was so, so slow. I feel like he hardly got to move since he still had plenty of skills left over, and I wasn't even trying to save them. At least he got to deal a lot of damage every time he did get a turn. His paralysis helped a lot too. Should have spammed his LD more before the red aura showed up. At least it was also helpful in removing the shields since it dealt a lot of damage.

Super glad I was able to win without having my own dark char.

Wonder if I can do the next Lufenia Quest with this same team? Really want to use Seph and Cloud as much as possible since I pitied their Bursts, especially Sephiroth because at least I got to use Cloud on all his events, but for Seph, I literally only got his Burst right after pitying Cloud's, so by then I was done with his and Ciaran's (from Final Fantasy Crystal Chronicles) Lufenia Quests.

Storming the Citadel (Mission Dungeon) Lufenia Quest

I found this one of the worst Lufenia fights ever. I absolutely loathe this freaking quest. Oh, I have no doubt that I wouldn’t hate this battle half as much I do right now if I wasn’t trying to get the complete using both Sephiroth and Cloud in the same team. I’d seen plenty of clears featuring Cloud, but I couldn’t find any that included the both of them.

I wanted to try the Lightning, Cloud, and Sephiroth team again, but I worried that it wouldn’t work because of the Lufenia orb. The orb has a very short max count of only 8, and the only way to increase it is whenever your party receives direct healing. I doubted that I could finish the fight with Lightning, Sephiroth, and Cloud before the Lufenia orb got triggered. So I didn’t bother trying, but maybe I should have anyway. Who knows? It could have worked. It’s too late now though because at the time I’m writing this post, the Storming the Citadel (Mission Dungeon) event is long over.

Since I didn’t think I could get my usual team to work, I decided to try the fight using Rude, Cloud, and Sephiroth. Rude is one of the chars who can fulfill the orb’s condition. Unfortunately, things weren’t working out at all. I’ve lost count of the number of times I’ve tried this quest, but it was a lot. I kept trying and trying with this team, but I couldn’t win.

The orbs were a constant issue. Their count is really way too freaking low that I’d have runs wherein I couldn’t get Rude to keep up with increasing the number, especially since the enemies were really fast. They have high turn rates and they would sometimes get back-to-back turns, which was automatically minus 2 on the orb count.

There were a lot of tries wherein I’d end up using my Summon pretty early on just to help me deal with the orbs.

The enemies also love dealing group HP attacks so my team was often not at full health. There were so many runs wherein I worried that my party would die since the enemies often brought them down to very low HP.

As soon as one enemy gets down to 49% HP, both of them will “begin a powerful chant” and start floating. They’ll gain 4 buffs and an even stronger BRV damage reduction when compared to earlier in the fight. If one of the enemies was already floating when this happens, then only the one who wasn’t will get these buffs. So, ideally, you should only get one of them down to 49% while one of them is already levitating. 

I’ve had numerous runs where I couldn’t do that though. There were so many times wherein I just couldn’t get the timing right. I’d end up getting one of them to 49% while they were both still on the ground, so they’d both levitate and get all the buffs. This made things even more difficult for me since my team’s damage really dropped when this happened. It wasn’t that high to begin with since I only really had Rude to provide party-wide buffs and auras. Cloud would have done better if I’d paired him with another support. As for Sephiroth - he’d need way more support to deal decent damage.

Anyway, there was one run wherein I actually managed to get things right in terms of only dropping the enemies down to 49% HP while one of them was already in the air. Was so pleased when this happened. I thought I actually had a chance to win. I Summoned, I activated my Cloud’s Burst mode, I used the friend support that I borrowed, I attacked and tried to deal as much damage as I could. But it wasn’t enough. I ended up running out of skills before the fight was over.

Using HP+ wasn’t cutting it because I needed more damage. I also needed to finish the fight ASAP, otherwise the orbs were going to kill me. After dropping the enemies down to 49% HP, the orbs will disappear. They will reappear after the enemies use their Globated Crush+ move. Sooner or later, my chars always ended up getting hit with this, so I had to deal with the orbs showing up again.

There was also the fact that once the enemies start floating, their turns can’t be delayed other than via break so Cloud’s LD was useless. I’d have to wait for them to get back on the ground before using Blade Beam.

Because of that, I even tried a run wherein I used Sephiroth’s Burst instead of Cloud’s, just so I could make use of his BT’s effect, which drops all the brave of all enemies down to 1 for 3 turns. This made it easy to keep delaying them even while they were floating. I couldn’t kill them though because my damage was lacking, so, eventually, Seph’s BT effect would end, and the enemies would soon be able to get a turn.

I kept trying and trying but, eventually, I got sick of doing this quest over and over again. I just wanted to get it over and done with already. Moreover, I was running out of time because the event was ending soon. I couldn’t keep doing this.

In the end, I decided to do this fight with Sephiroth, Rude, and Desch (from Final Fantasy III). This was inspired by a run I saw that featured this exact same team although we had different equipped Calls. 

I had Sephiroth equipped with Rem Tokimiya’s (from Final Fantasy Type-0) Call, which heals the party, but I should have given him a Call that inflicts debuffs instead so that I could have used it when the bosses floated and gained their buffs at 49% HP. Thankfully, the friend support Cloud that I borrowed had his Deadly Rush passive equipped. This passive allows him to dispel buffs.    

Desch is another char who can also increase the orb count in this quest. He works very well with Rude because Rude makes it so that any over healing is converted to brave. So whenever the party was at full health, Desch ends up batterying them with his moves aside from just dealing damage.

He also provides some pretty good buffs and auras, including resistance to physical or magical attacks (depending on his current stance). It’s RNG, but he can also paralyze enemies. It’s really freaking awesome whenever it gets to proc. More than that, he also makes enemies weak to the thunder element and he Enchants the party so they can hit for weakness damage. Thanks to him and Rude, Sephiroth actually dealt pretty decent damage in this fight.

Between Rude and Desch, the orbs became much more manageable. Anyway, Sephiroth was the one who finished off the last remaining boss. By then, he only had 2 uses of Fervent Blow left. He was all out of Octaslash and Scintilla. 

I didn’t get the chance to use Rem’s Call earlier since Rude and Desch handled the healing very well on their own. So I found myself using it now. This gave Seph more brave, which was more than enough to finish off the last boss who only had 1% HP left. I could have just used Fervent Blow already, but I decided to use his Additional Ability (AA) first. This was actually the turn after he cast his Ex so he had a free skill use. I opted to use his AA for the attack up before finally casting Fervent Blow.

And it’s finally done. At long last, I’m finally done with this Lufenia Quest. It only took one run with this team to get the win, which is great, of course. I’m glad I was able to win.

But I still can’t help but feel rather disappointed anyway. I was really hoping I’d be able to use Cloud and Sephiroth together in this Lufenia Quest. Sigh. I suppose I could do another run of this fight with Cloud this time, but eh, I already know he can do it, and I’m really sick of this battle by now so meh. Never mind. Here’s to hoping the next quest will make it easy for me to use both Sephiroth and Cloud together. Gotta use the Bursts I pitied back-to-back, you know? LOL.

Tree for the Void Lufenia Quest

The Tree for the Void is Exdeath’s (from Final Fantasy V) Lost Chapter event. After the hell that was the last Lufenia Quest, this one was like a breath of fresh air. Super pleased that I was able to use both Cloud and Sephiroth here. In fact, I was able to get my team of Cloud, Lightning, and Sephiroth to work in this fight, which is just all kinds of awesome. Hell, yeah!

As usual, I ended up bringing Penelo’s and Rude’s Calls for healing, in case things go wrong, and Reno’s for the debuffs. I brought Ifrit as my Summon for his attack up and because the bosses shouldn’t be getting any turns at all. I borrowed a friend support Cloud for his paralysis, turn delay, and damage.

Anyway, as soon as it was Sephiroth’s turn, I had him use Reno’s Call to apply its debuffs then I immediately switched him out for the friend support Cloud. It took way too long, but I reset until I managed to get both Clouds to paralyze with their Cross Slash. At first, I started by using Finishing Touch with my Cloud then just reset until the friend Cloud paralyzed with his Cross Slash but it wasn't working out because Lightning ended up taking a lot of turns so the enemy who wasn't paralyzed yet would get their aura before Cloud could move again.

But once both enemies were paralyzed, it was pretty smooth sailing from there. Just needed to make sure the enemies never get to move. Used the friend Cloud's Burst then his LD for more turn delay.

Lightning took all the turns as usual. Mostly, I spammed her moves with the occasional HP+. Cloud dealt a lot of damage too. Ended up using his Burst for even more damage. I feel like he didn't get to move much though since he still had plenty of skills left over whereas Lightning was down to 1 use of Sparkstrike near the end.

Sephiroth was... there. He's faster than Cloud so he got to move more often. I guess the debuff from his LD helped too. His damage was... okay? Oh, and he was the one who finished off the last enemy. Surely, that counts for something, right? LOL. In all seriousness though, Seph was the weakest link in this team. Bringing Kurasame instead for his increase HP damage taken debuff would have been much better.

Super pleased I was able to win with this team.

Conclusion

So, what about you? Which chars did you use to complete these Lufenia Quests? Did you pull for either Sephiroth or Cloud Strife or both? Feel free to share your thoughts and opinions by leaving a comment below or by reblogging or replying to this post.

Notes:

  • screenshots are from my Dissidia Final Fantasy: Opera Omnia game account
  • originally published on my main Tumblr blog on Apr 26th, 2021 10:16:39pm

Thoughts About The End Of The Hetalia: Axis Powers World Meeting Scene

Monday, April 25, 2022

Also known as "Feeling disappointed and sad about the end of the Hetalia: Axis Powers world conference scene". Why did the aforementioned scene have to end? I’m definitely going to miss it. I wonder if I’ll get to see another episode with a similar scene like this?

But, you know what, that feeling of sadness and disappointment isn’t just because this awesome scene has come to an end. It’s also because of how it ended and what came after it, which certainly can’t be described as a good thing.

The world meeting scene happened in season 1, episode 1 of the Hetalia: Axis Powers anime and manga series by Hidekaz Himaruya. This scene introduced us to characters like America, Russia, Germany, Italy, France, Switzerland, and more.

Some of the good things about this scene:

  • Being able to meet many of the countries of the world
  • Getting to know some of the characters
  • This was the perfect beginning to the series thanks to how funny, humorous and interesting it was
  • This scene definitely has rewatch value - you can watch it over and over again and not get sick and tired of doing so

Don’t want the Hetalia world meeting scene to end

It was definitely sad when this scene ended. I wish it could have gone on longer considering how interesting it was. I’m definitely looking forward to seeing a scene like this again in later episodes of Hetalia (there are more scenes like this, right? I certainly hope so). 

Another reason to feel sad and disappointed about the end of the Hetalia world conference scene

It feels like this scene ended so abruptly, actually. After Italy yelled “pasta” and we saw the opening credits of Hetalia: Axis Powers (#ad), I thought that, right after that, we would get back to the world conference and we can see other countries or we can find out more about the countries that we’ve already met. I thought we might even get to see more speeches.

Unfortunately, that’s not what happened at all. Italy yelling “pasta” was pretty much the end of the aforementioned scene. After that and the Hetalia opening credits, we move on to another scene.

Abrupt scene change

You know, that wouldn’t have been so bad if the scene change hadn’t happened so abruptly and if we’d actually gotten to see any one of the characters that we just met during the meeting.

Meeting a new Hetalia character - the Roman Empire

But, no, instead of seeing characters that we already know, we get introduced to yet another new character - the Roman Empire. He didn’t even show up during the first part of this episode so his sudden appearance was abrupt and it seemed like he came from out of nowhere. What happened to the world meeting and the characters present in that meeting?

Moving from the present to the past - why?

Another problem with this scene change is how we clearly moved from the present to the past. This was made more obvious thanks to the appearance of the Roman Empire. 

  • What’s the reason for this scene change? 
  • Even if the world meeting had to end, why did we get introduced to this new character now? 
  • Why did we go from the present to the past? 

It would have been much more interesting and definitely better if we got to see what each of the characters did after the world conference ended. 

Conclusion

So, what about you? What’s your take on this? Do you wish that the world meeting scene didn’t have to end or that, at the very least, we didn’t suddenly change scenes from the present to the past? Feel free to share your thoughts and opinions by leaving a comment below or by reblogging this post.   

Notes:

  • pic is from Amazon.com; link shown above
  • originally published on my Hetalia Archives blog on Mar 27th, 2015 10:57:21am

Dissidia Final Fantasy: Opera Omnia Spheres Guide and Plans Part 2

Friday, April 22, 2022

In the Dissidia Final Fantasy: Opera Omnia (DFFOO) mobile game, you get a Sphere every time you Purple an Ex weapon or get it to Ex+ 3/3. These Spheres increase stats like Attack and Max Brave. Each character has 3 Sphere Slots.

So far, I’ve only given Spheres to a few chars. This post lists those Spheres and chars, including possible Sphere plans for other charas and potential new plans for those who already have Spheres. You can find part 1 of this post here.

Chars that appeared in part 1 won’t be mentioned again here unless I’ve made changes to their Spheres or something. Chars with only Refined Spheres or RF Spheres won’t be included either.

Aerith or Aeris Gainsborough from Final Fantasy VII

In part 1, I said that my Aerith Gainsborough was fully MLB and Purple and that I was planning to pull for her upcoming LD after which I’d fill out her Sphere Slots.

Actual best or perfect Spheres for Aeris:

Aerith’s Sphere Slots are A, C, and D. Although she is a support slash healer, most, if not all, of her stat gains are based on her Attack. For instance, she can increase HP Recovery and BRV gain based on her Attack stat. So the best Spheres for her are those that increase the aforementioned stat. Her secondary stat is Initial Brave, but she also has a Max Brave aura, so increasing that isn’t a bad idea either. So I’d give her the following Spheres that increase the Attack stat:  

  • Noel Kreiss’s (from Final Fantasy XIII-2 and Lightning Returns: Final Fantasy XIII) A Sphere
  • either Queen’s (from Final Fantasy Type-0), Lyse Hext’s (from Final Fantasy XIV), or Deuce’s (from Final Fantasy Type-0) D Spheres  
  • either Garnet Til Alexandros XVII’s (from Final Fantasy IX), Maria’s (from Final Fantasy II), or Alphinaud Leveilleur’s (from Final Fantasy XIV) C Spheres
Plans:

From part 1, I said my tentative plan was to give Aerith the following Spheres that increase her Attack:

  • Vaan’s (from Final Fantasy XII) A Sphere
  • either Garnet’s, Maria’s, or Alphinaud’s Spheres, whichever one Aeris can consistently and constantly proc
  • either Lyse’s or Deuce’s Spheres, whichever one doesn’t go to Tifa Lockhart (from Final Fantasy VII)

Noel’s Sphere already belongs to someone else so I can’t give it to Aerith so I thought about giving her Vaan’s instead. I have Vaan’s, Lyse’s, Deuce’s, and Maria’s Ex weapons. My Garnet is Purple so I already have her Sphere. I’m missing Alphinaud’s Ex. Queen is an upcoming new chara so I don’t have anything for her yet.

What Actually Happened:

Aerith’s LD showed up before Tifa’s so she got first pick from the Spheres I had available. She now has the following equipped:

  • Vaan’s (from Final Fantasy XII) Full HP Attack Up A Sphere

Raises ATK by 10% while HP is MAX

Aeris is a healer so she shouldn’t have much issues in keeping this Sphere’s effect active. 

  • Garnet Til Alexandros XVII’s (from Final Fantasy IX) HP Heal Attack Up Longer C Sphere

When recovering own HP:
• Raises own ATK by 10% for 6 turns

The issue with this is the fact that Aeris only recovers HP whenever she uses her skills or Ex. Her skills don’t deal damage, so it’s not a good idea to spam them. Her Ex does charge fairly fast enough, and the turn duration for this Sphere is 6 turns, so, after thinking about it some more, I figured this should work well enough, especially when compared to Maria’s and Alphinaud’s, both of which only last for 3 turns. 

  • Deuce’s (from Final Fantasy Type-0) All Buff Attack Up 3 D Sphere

Raises party’s ATK by 5% with 3 or more active buffs

Was able to get Deuce’s LD so I figured I might as well Purple her instead of Lyse who doesn’t even have an LD yet. Queen’s is better than both of them since it has a secondary stat but I didn’t want to wait that long before giving Aerith a D Sphere.

Deuce’s Sphere is perfect for Aerith since she starts battle with exactly 3 buffs: Cetra’s Favor, ATK Up, and Ancient Lineage. When she uses her first skill, she’ll get a 4th buff - INT BRV Up. Using her LD will give her a 5th - Seal Evil.

Future plans:

I’m happy enough with my Sphere choices for Aeris so, at the moment, I’ve no plans to change them anytime soon.

Terra Branford from Final Fantasy VI

Terra Branford (from Final Fantasy VI) wasn’t listed in part 1. I like her well enough but I didn’t think I’d be able to go for her Burst or LD. Was able to acquire her LD though and her Burst actually came home twice so I decided to show my appreciation by giving her Spheres. 

Actual best or perfect Spheres for Terra:

Terra’s Sphere Slots are A, D, and E. She’s a magical DPS so Spheres that increase her BRV damage, Attack, or Magical Attack is best. Due to the increasing BRV damage reduction in Lufenia quests, BRV damage up is preferable to Attack and Magical Attack up. So if I could give her any Sphere in the game, I’d go with:

For her A Sphere, I’d focus on increasing her BRV damage so either Cloud Strife’s (from Final Fantasy VII), Edgar Roni Figaro’s (from Final Fantasy VI), or  Vayne Carudas Solidor’s (from Final Fantasy XII) are great choices.     

For her D Sphere, I’d go with either Hope Estheim’s (from Final Fantasy XIII) or Queen’s since both increase the Attack and Max Brave stats.

For her E Sphere, Seymour Guado’s (from Final Fantasy X) is perfect since it raises the Attack stat by a whopping 15%.

What Actually Happened:

Cloud’s, Edgar’s, Vayne’s, Hope’s, and Seymour’s Spheres already belong to other chars so Terra can’t have them. Just like with Aerith, I don’t want to wait for Queen to get here before giving Terra a D Sphere. So I ended up giving her: 

  • Gau’s (from Final Fantasy VI) Full HP Power A Sphere

Increases BRV damage dealt by 10% while HP is MAX

This is similar to Cloud’s, Edgar’s, and Vayne’s Spheres in that it gives 10% BRV damage up. Where they differ is in the activation condition. At first glance, Gau’s seems really easy to maintain but there are enemies who love to HP attack. Sometimes, chars could get debuffs that drain or sap away their HP. These instances may not happen all that often, but they can and do happen so it’s something to take note of.

So if I had other options, I’d prefer to give Terra another BRV damage up Sphere because there have been times wherein she wasn’t at full HP so I wasn’t able to get this Sphere to proc until my healer got her back to max health.

I remember this fight wherein I didn’t have a healer in my main party. Terra ended up taking HP damage. I did bring a healer Call but it wasn’t enough to get her back to full HP. She was missing this tiny bit of HP, and I couldn’t do anything about it anymore because I was all out of healing. It was kinda frustrating but I still won anyway so it wasn’t that bad. Still, these are things to take note of when it comes to these kinds of Spheres.

  • Ashelia B'nargin Dalmasca’s (from Final Fantasy XII) Buff Success Attack All Longer D Sphere

After granting buff:
• Raises party's ATK by 5% for 6 turns

Since Terra starts quests with the Esper Blood buff, this Sphere’s effect is also active from the beginning. Her LD, Ex, and base skills give her buffs so any of them can ensure this Sphere will always be active.

  • Yuffie Kisaragi’s (from Final Fantasy VII) Debuff Success Attack Boost Up Shorter E Sphere

Raises own MAX BRV, ATK by 10% for 3 turns when inflicting debuff on target

Terra’s base skills inflict 1 debuff so she can easily keep this Sphere’s effect active. The only issues are if the enemies happen to be immune to her debuffs, or if enemies end up having framed buffs or debuffs since Terra’s debuffs are generic and unframed.

Future plans:

I’m happy enough with my Sphere choices for Terra. I mean, obviously, they could be better but the ones I’ve given to her work well enough. So, at the moment, I’ve no plans of changing them. 

Sephiroth from Final Fantasy VII

I mentioned Sephiroth from Final Fantasy VII (#ad) in part 1. He’s equipped with the following A Spheres:

  • Jecht’s (from Final Fantasy X) Critical Base Attack Up Shorter (RF) A Sphere

When dealing critical hit:
• Raises INT BRV, ATK by 4% for 3 turns

  • Jack’s (from Final Fantasy Type-0) Critical Attack Up Shorter Power A Sphere

When dealing critical hit:
• Raises BRV damage by 5%, ATK by 5% for 3 turns

  • Yuri’s (from Final Fantasy Crystal Chronicles: Ring of Fates) Full HP Attack Boost Up A Sphere

Raises own MAX BRV, ATK by 5% while HP is MAX

Then I decided to replace Jecht’s RF Sphere with a real one. Ended up giving him:

  • Cloud Strife’s (from Final Fantasy VII) Critical Power

Raises BRV damage dealt with critical hits by 10%

Actual best or perfect Spheres for Sephiroth:

Sephiroth is a DPS. He can gain BRV based on his Attack and HP damage dealt, so the best Spheres for him are those that increase his Attack stat (the best of which was Noel’s since it increases ATK by 15% but you can’t stack it) and/or BRV damage dealt (they all give 10% so it was just a matter of picking the one that he can easily proc). I could go with either triple Attack up or triple BRV damage up Spheres, or a combination of both.

Plans:

I said in the first post that I was leaning towards giving him triple BRV damage up Spheres although I wasn’t sure yet and that I wanted/needed to think about this some more.

What Actually Happened:  

Well, I did take quite a while thinking about what to do. Eventually, I made up my mind. Now Sephiroth is equipped with the following A Spheres:

  • Edgar Roni Figaro’s (from Final Fantasy VI) Debuff Power

Increases BRV damage dealt by 10% while an enemy is debuffed

  • Cloud Strife’s (from Final Fantasy VII) Critical Power

Raises BRV damage dealt with critical hits by 10%

  • Vayne Carudas Solidor’s (from Final Fantasy XII) Broken Power

When attacking target afflicted with Break:
• Increases BRV damage dealt by 10%

Future plans:

I Purpled Edgar and Vayne just to get their Spheres and give them to Sephi so, at the moment, I definitely have no plans of overwriting them. I’m actually pretty pleased with Seph’s Spheres since he gets 30% BRV damage up thanks to them. 

Ahh, if only he could really take advantage of these Spheres. Unfortunately, he’s been powercrept to oblivion by now so even with 30% BRV damage up, his damage output is subpar and not worth talking about at all. Can’t wait for him to get his rework and update.

Update: 

Sephiroth’s much-awaited rework and update has finally arrived. His LD Board’s been unlocked as well. Completed them and also updgraded his armor to Blue. Now he’s doing very well.

Machina Kunagiri from Final Fantasy Type-0

Machina was featured in part 1. Haven’t made any changes to him since then but I mentioned in part 1 that I regret giving him Yang Fang Leiden’s (from Final Fantasy IV) A Sphere (increases ATK and MAX BRV by 10%), and that I was considering removing it from him. 

I regretted giving this Sphere to Machina since I didn’t get to use him that much. The only reason he still has this Sphere was because I’m reluctant to use one of my reset stones to remove it, and I don’t have anyone yet that I really want to give it to instead.

Recently though, I found out that Machina got a Burst in the Japanese version of Dissidia Final Fantasy: Opera Omnia. This is super special awesome news. I do like Machina and I’m glad to find out that he got a Burst. Definitely plan to pull for it whenever it shows up in the Global or English version of the game.

Maybe it wasn’t so bad anymore that Machina has Yang’s Sphere. If I get his Burst, I’m sure to use him several times at least. But who knows? I might still end up removing this from him anyway. For now though, he can keep it unless I find another char that I want to give it to.

Whether I keep Yang’s Sphere on him or not, I do want to fill out all of Machina’s Sphere Slots if I get his Burst. He’s a DPS so Attack up and/or BRV damage up A Spheres should work very well for him. For his B Slot, Celes Chere’s (from Final Fantasy VI) Ability BRV Gain appears to be the best

Increases BRV by 40% of INT BRV after using ability, once per turn
*Also applies to abilities changed from BRV Attack, HP Attack

since Machina isn’t a tank and can’t inflict the lock debuff, which most B Spheres require.

Tifa Lockhart from Final Fantasy VII

In part 1, I said that my Tifa Lockhart was fully MLB and Purple and that I was planning to pull for her upcoming LD after which I’d fill out her Sphere Slots.

Actual best or perfect Spheres for Tifa:

Tifa’s Sphere Slots are A, A, and D. She is a single target DPS, so Spheres that increase her Attack and/or BRV damage are the best for her. She can also increase her BRV based on her Attack stat.

So to maximize that BRV gain, I would give her Noel’s A Sphere and one that increases her ATK by 10% like Yang’s. To increase her BRV damage, I'd give her A Spheres like Cloud’s. Or I could go with Noel’s and Cloud’s to increase both. For her D Sphere, Queen’s is the best.

Plans:

From part 1, I said my tentative plan was to give Tifa the following Spheres:

  • Onion Knight’s (from Final Fantasy III) Critical Raging Attack Up A Sphere

Raises ATK by 2% when dealing critical hit up to 5 times, once per turn

  • Shadow’s (from Final Fantasy VI) Single Critical Attack Up Longer A Sphere

Raises ATK by 10% for 6 turns when dealing critical hit to single target

  • either Deuce’s or Lyse’s D Spheres

I have the Ex weapons of the aforementioned charas, so all I need to do is Purple said weapons in order to acquire their respective Spheres.

I’ve changed some of my plans since then though. As I write this post, Tifa’s LD is coming very soon. Here’s my updated tentative plan:

  • Garland’s (from Final Fantasy I) Break Hit Raging Attack Up A Sphere

Raises ATK by 2% when inflicting Break or attacking target afflicted with Break up to 5 times, once per turn

My Garland is Purple so I already have this Sphere. It’s basically the same as Onion Knight’s anyway, aside from the activation condition.

  • Shadow’s A Sphere

Ended up Purpling Shadow to help me farm the Divine Alexander Boards where he’s synergy so I already have his Sphere.

  • Lyse’s D Sphere

Already gave Deuce’s Sphere to Aerith and I don’t want to wait for Queen’s, so my only remaining option is Lyse’s. Have yet to Purple her though. I’ll do it after getting Tifa’s LD. 

Update: I’ve been thinking about this some more, and I’m wondering if it wouldn’t be better to equip Tifa with an A Sphere that increases her ATK and another that increases her BRV damage. Maybe I could go with:

  • Shadow’s or Garland’s A Spheres, probably Shadow’s since Tifa’s one of the few chars who can make use of it
  • Leo Cristophe’s (from Final Fantasy VI) Single Power A Sphere

When attacking single target:
• Increases BRV damage dealt by 10%

My Leo is Purple so I already have this Sphere. Like with Shadow, Tifa’s one of the few chars who can make use of this Sphere.

  • Lyse’s D Sphere

Welp, ended up Purpling Lyse’s Ex already even though Tifa’s LD banner has yet to drop. Haven’t given it to Tifa yet though.

What Actually Happened:

Tifa’s event and banner have finally arrived. I talk more about how my pulls for her LD went (spoiler alert: it went badly. Very badly) in another post so, here, let’s just jump straight to the Spheres I ended up giving her. Like Galuf and Kadaj, I upgraded her armor to Blue. She’s my 3rd char to get Blue armor.

  • Shadow’s (from Final Fantasy VI) Single Critical Attack Up Longer A Sphere

Raises ATK by 10% for 6 turns when dealing critical hit to single target

Garland’s Sphere ended up going to Kadaj. Didn’t want to Purple Onion Knight. Besides, already have Shadow’s, and Tifa’s one of the few who can make use of this since she’s a pure single target DPS.

  • Leo Cristophe’s (from Final Fantasy VI) Single Power A Sphere

When attacking single target:
• Increases BRV damage dealt by 10%

I thought it was better to give Tifa a combination of ATK up and BRV damage up Spheres so I went with Leo’s instead of giving her another ATK up Sphere. Plus, like Shadow’s, Tifa’s one of the few who can make use of Leo’s Sphere.

  • Lyse Hext’s (from Final Fantasy XIV) Break Hit Attack All Longer D Sphere

After inflicting Break or attacking target afflicted with Break:
• Raises party's ATK by 5% for 6 turns

Future plans:

Tifa deserves all the hype she got. She’s really freaking good. Super special awesome. Her damage is absolutely amazing. It’s off the charts, especially with her Blue armor. Very pleased with her and her equipped Spheres seem to be working very well too.

Sure, I could have given her Noel’s for a higher ATK up and Queen’s to get both party ATK and MAX BRV up, but it’s fine. For now, I’m pleased enough that I don’t have any plans of changing her equipped Spheres anytime soon.  

Kadaj from Final Fantasy VII: Advent Children

Kadaj from Final Fantasy VII: Advent Children is coming soon as a new playable char in Dissidia Final Fantasy: Opera Omnia. In fact, he’s set to show up before Tifa. I’m considering giving him Spheres though nothing’s set in stone yet. 

Actual best or perfect Spheres for Kadaj:

Kadaj’s Sphere Slots are A, A, and E. He’s a debuffer with DPS capabilities so maximizing either his ATK and/or BRV damage is best. So for his A slots, I could go with the same setup as Tifa’s - Noel’s and Yang’s, or Noel’s and Cloud’s, or Cloud’s and Edgar’s, or other such similar Spheres. For his E Sphere, Seymour’s seems to be the best.

Kadaj’s main gimmick is being able to put a gold frame around his debuffs. Gold-framed debuffs can’t be dispelled no matter what. Kadaj is the first char to get this mechanic. So far, in the Japanese version of DFFOO, he and Sephiroth are the only ones with gold-framed debuffs. Sephi will get this mechanic with his upcoming rework and update.

Anyway, if you give Kadaj an E Sphere that inflicts a debuff (such as defense down from Ultimecia’s (from Final Fantasy VIII) Sphere), then he'll also be able to gold frame said debuff. If you use a Call that inflicts the same debuff but with a higher potency, that will overwrite the lower potency debuff but the debuff itself will still be gold-framed thanks to Kadaj. So giving him these kinds of E Spheres are also an option.

Plans:

I was thinking of giving Kadaj the following Spheres:

  • Onion Knight’s A Sphere
  • Oerba Yun Fang’s (from Final Fantasy XIII) Break Hit Attack Up Longer A Sphere

Raises ATK by 10% for 6 turns when inflicting Break or attacking target afflicted with Break

I have Fang’s Ex but she’s not Purple.

  • Exdeath’s (from Final Fantasy V) Debuff Attack Up

While enemy is debuffed:
• Raises ATK by 10%

Currently missing Exdeath’s Ex, which is unfortunate since it seems perfect for Kadaj considering he’s a debuffer and his debuffs can’t be dispelled once he gold frames them.

  • The Emperor’s (from Final Fantasy II) Debuff Success Attack Up Longer E Sphere

Raises own ATK by 10% for 6 turns when inflicting debuff on target

My Emperor is Purple so already have this Sphere.

  • Ultimecia’s (from Final Fantasy VIII) Full HP Critical Guard Down E Sphere

Inflicts DEF Down 30% for 6 turns when dealing critical hit while HP at MAX

My Ultimecia’s Purple so already have this Sphere.

  • Auron’s (from Final Fantasy X) Debuff Success Melee Attack Up Longer E Sphere

When inflicting debuff on target:
• Raises melee ATK by 15% for 6 turns
*Does not stack with same sphere

Have Auron’s Ex but he’s not Purple. I think he’s not even at Ex+ 0/3 yet. Pretty sure his base Ex isn’t MLB yet either.

At the moment, I’m leaning towards boosting Kadaj’s damage so I think I prefer to give him Spheres like the Emperor’s instead of ones like Ultimecia’s.

What Actually Happened:

Kadaj’s event and banner have finally arrived. I talk more about how my pulls for his weapons went and how I built him in another post so, here, let’s just jump straight to the Spheres I ended up giving him.

  • Garland’s (from Final Fantasy I) Break Hit Raging Attack Up A Sphere

Raises ATK by 2% when inflicting Break or attacking target afflicted with Break up to 5 times, once per turn

This Sphere was supposed to go to Tifa and Kadaj was supposed to get Onion Knight’s. But although I already have Onion Knight’s Ex, he isn’t Purple yet. The latest story chapter that featured him here in this game really made me hate him so I’m really not keen on Purpling him anytime soon, possibly ever. And I really didn’t want to have Kadaj equipped with his Sphere so I decided to just go with Garland’s.

It helped that I already have Garland’s Sphere so all I needed to do was equip it to Kadaj. As for Tifa, well, I don’t know now. Maybe she will just get Leo’s and Shadow’s A Spheres. If I really need another attack up Sphere for her, then I guess I’ll have no choice but to Purple Onion Knight, but I’ll think about that when the time comes.   

  • Oerba Yun Fang’s (from Final Fantasy XIII) Break Hit Attack Up Longer A Sphere

Raises ATK by 10% for 6 turns when inflicting Break or attacking target afflicted with Break

Ended up Purpling Fang so I could equip her Sphere to Kadaj. She’s been horribly powercrept by now and she has yet to be updated or reworked even in the Japanese version of DFFOO so I doubt I’ll be using her anytime soon unless she happens to be synergy in a Challenge Quest and I don’t have other chars that I could make use of to clear said quest. Ah, well. At least I’m ready whenever she gets an LD. LOL.

  • The Emperor’s (from Final Fantasy II) Debuff Success Attack Up Longer E Sphere

Raises own ATK by 10% for 6 turns when inflicting debuff on target

Was trying to decide between this or Auron’s Sphere. In the end, I went with Emperor’s, mostly because I already have his Sphere whereas I would have had to spend more resources to MLB Auron’s base Ex then Purple it just to get his Sphere.

Future plans:

At the moment, I’m pretty satisfied with my Sphere choices for Kadaj. Sure, of course, they could be better like giving him Noel’s A Sphere for a 15% ATK up instead of just 10% but that would mean spending resources to Purple another copy of Noel’s Ex which I’m not inclined to do at the moment. So for now, I’ve no plans of changing or wanting to change Kadaj’s Spheres. 

Update: Welp, never say never, huh? Lately, I’ve found myself thinking a lot about Kadaj’s Spheres. I kinda want to change them. I’m thinking about giving him 2 A Spheres that increase his BRV damage such as Cloud’s and Vayne’s. For his E Sphere, I’m considering either Auron’s or actually Purpling a dupe Seymour Ex for another copy of his Sphere.

What’s stopping me from doing any of these is the fact that I’m either going to have to use my 3 Sphere removers to get back the Spheres that I already equipped to Kadaj or accept that I’ll lose them all just to replace them with other Spheres. I’ll also have to Purple dupes if I want to give Kadaj BRV damage up A Spheres. 

So I don’t know. I want to do it, but it’s gonna cost me a lot. Currently undecided on whether it’s worth it to spend all these resources. Ahh, if only we could freely move Spheres around without losing them, or if only the Sphere removers didn’t cost actual money. Sigh. Guess I need to think about this some more.

Much later: ended up upgrading Kadaj’s armor to Blue. That’s currently the highest that an armor can go. The resources to do this are very rare. Kadaj is my first Blue Armor, and I don’t regret it, but it is making me think more about giving him BRV damage up Spheres even though it seems like he’s already doing very well with the ones he’s currently equipped with. Really gonna have to think about this some more.

Galuf Halm Baldesion from Final Fantasy V

The banner featuring Galuf Halm Baldesion’s (from Final Fantasy V) LD is coming soon. Very soon. He’ll show up before Tifa’s LD banner and a bit after Kadaj’s. The order goes like this:

  1. Kadaj
  2. Bartz Klauser from Final Fantasy V - including LD and Burst. Pulling for him although, at the moment, I’ve no plans to give him Spheres
  3. Galuf
  4. Tifa

All the banners will actually overlap, but anyway, the point is, Galuf is also coming very soon and I’m planning to pull for his LD. 

Already have his 15cp, 35cp, and Ex fully MLB. His Ex is Purple or at Ex+ 3/3. Galuf’s a tank, and I heard he gets pretty good with his LD. But the main reason why I want to pull for him is because I consider him as kind-of, sort-of like a tribute to my grandparents, like someone that represents them. I mean, I’m not exactly saying Galuf’s like them since I don’t actually know that much about Galuf. It’s more the fact that he’s a grandfather, I guess. It may not make much sense, but it is what it is for me. The point is this is why I’m planning to pull for Galuf with gems and why I want to give him Spheres.  

Actual best or perfect Spheres for Galuf:

Galuf’s Sphere Slots are A, B, and D. He’s a cover tank. He takes the place of his allies whenever they’re targeted by single-target attacks. IIRC, he has 100% evasion from physical attacks unless they’re guaranteed to hit. He has the chance to evade magical attacks. Every time he successfully evades an attack, he counters. With the buff from his LD active, he’ll counter even if an attack doesn’t miss him.

To maximize the damage from his counters, ATK up Spheres are best for him. He has a BRV gain mechanic, especially when coupled with his High Armor, so to maximize that, a BRV gain Sphere is also an option for him. The same could be said for MAX BRV up Spheres since he can battery based on the aforementioned stat. ATK up Spheres are preferable though since he can also battery based on HP damage dealt and he should be countering often.

So I could give him an ATK up A Sphere like Noel’s, his own B Sphere (also raises the ATK stat), and a D Sphere like Hope’s or Queen’s. 

Plans:

The problem is that most chars seem to want an ATK up or BRV damage up Sphere. I’m close to running out of these types of Spheres. There are some Ex weapons that I’m missing but I didn’t feel like waiting until I managed to acquire them. I wanted to give Galuf Spheres right after getting his LD. So I was thinking of giving him a MAX BRV up Sphere. I’ve got plenty of those since it seems like no char wants them, or I’ve yet to want to Sphere a char who wants to increase their max brave stat.

I thought increasing Galuf’s MAX BRV stat shouldn’t be such a bad idea since he does have BRV gains and he can battery the party based on max brave. So for his A Sphere, I considered Spheres like:

  • Squall Leonhart’s (from Final Fantasy VIII) Break Hit Raging Boost Up A Sphere

Raises MAX BRV by 2% when inflicting Break or attacking target afflicted with Break up to 5 times, once per turn

My Squall is Purple so I already have this Sphere.

  • Terra Branford’s (from Final Fantasy VI) Critical Base Boost Up Shorter A Sphere

When dealing critical hit:
• Raises own INT BRV, MAX BRV by 10% for 3 turns

What makes this better than Squall’s is the fact that it increases 2 stats instead of just 1. Not sure how good INT BRV is for Galuf though. There could be another char who could use both these stats so I might be better off just giving Squall’s Sphere to Galuf.

There are only a few B Spheres and even fewer that Galuf can make use of. Some B Spheres require him to be targeted but he has no way of locking or taunting his opponents. Some require him to take HP damage but that will rarely happen. So after going through the short list, I was left with the following:

  • Galuf Halm Baldesion’s (from Final Fantasy V) Evasion Attack Up Longer B Sphere

When dodging attack:
• Raises ATK by 10% for 6 turns

This is perfect for Galuf but since I was considering giving him a MAX BRV up Sphere, I thought I might be better off with

  • Gabranth’s (Noah fon Ronsenburg from Final Fantasy XII) Critical Resist All Shorter B Sphere

After dealing critical hit:
• Reduces party's BRV damage taken by 10% for 3 turns 

My Gabranth is Purple so I already have this Sphere.

There are other protective B Spheres like one that reduces HP damage taken and another that reduces BRV damage taken. Unfortunately, neither are for the party so I didn’t want to give them to Galuf. Just as well, really, since I don’t have the Ex that gives the former (Kimahri Ronso from Final Fantasy X) and I’ve yet to Purple the Ex that gives the latter (the Warrior of Light from Final Fantasy I). 

If I was going to give Galuf an A Sphere that increases his MAX BRV, then I thought it best to give him a D Sphere that does the same, especially since I’ve also basically run out of ATK up D Spheres. So I considered Spheres such as the following:

  • Ramza Beoulve’s (from Final Fantasy Tactics) Buff Base Boost All 3 D Sphere

With 3 or more buffs:
• Raises party's INT BRV, MAX BRV by 5%

My Ramza is Purple so have this Sphere already. This one is basically like Terra’s except the stat ups are only 5% and they’re for the party.

  • Ignis Scientia’s (from Final Fantasy XV) Buff Success Boost All Longer D Sphere

After granting buff:
• Raises party's MAX BRV by 5% for 6 turns

Also already have this Sphere.

What Actually Happened:

Galuf’s event and banner have finally arrived. I talk more about how my pulls for his LD went and how I built him in another post so, here, let’s just jump straight to the Spheres I ended up giving him. Well, let me at least say that I also ended up upgrading his armor to Blue. He’s the second char whose armor I upgraded to Blue.

Even after acquiring Galuf’s LD, I still wasn’t sure what to do about his Spheres. I even considered Purpling dupe Ex weapons for him but couldn’t make up my mind about this. I was looking at the list of A Spheres that I currently had available to me in the game. That was when I came across this:

  • Eight’s (from Final Fantasy Type-0) Evasion Attack Up Shorter A Sphere

Raises own ATK by 20% for 3 turns when evading enemy attack
*Does not stack with same sphere

Welp, I’d completely and totally forgotten that I actually have Eight’s Sphere. But I guess it wasn’t so surprising that I always ended up glossing over this whenever I looked at a list of Spheres online. That’s because the condition requirement for this Sphere is basically impossible for most chars to fulfill. AFAIK, so far, only Eight and Galuf can consistently and constantly proc this Sphere.

Was so pleased to find out that I have this Sphere. Because now I don’t have to consider the pros and cons of giving Galuf an mbrv up Sphere or Purpling dupe Ex weapons. Now I can just give him Eight’s Sphere which was exactly what I did. 

  • Galuf Halm Baldesion’s (from Final Fantasy V) Evasion Attack Up Longer B Sphere

When dodging attack:
• Raises ATK by 10% for 6 turns

Since I gave him Eight’s Sphere, I also readily gave Galuf his own B Sphere.

  • Wakka’s (from Final Fantasy X) Buff Attack Boost All 5 D Sphere

With 5 or more buffs:
• Raises party's MAX BRV, ATK by 5%
*Does not stack with same sphere

I still wasn’t sure about Galuf’s D Sphere until I saw a guide that mentioned he could easily proc Wakka’s Buff Attack Boost All D Sphere. Since this one requires 5 or more buffs, not all chars with D Slots can make use of this. 

Even after knowing this though, I still hesitated for a bit as I thought about who else could make use of Wakka’s Sphere. In the end, I decided to go for it. If another char wants an ATK up D Sphere, well, I guess I’ll worry about that then. Besides, Galuf’s supposed to be a tribute to my grandparents so I want him to have the best of everything I could possibly give to him.

Future plans:

Very pleased with my Sphere choices for Galuf. I think they’re the best they could be, all things considered. So, at the moment, I have no plans of changing any of them anytime soon.

Yuna from Final Fantasy X

Yuna (from Final Fantasy X) was really nice to me. Managed to get her LD and Burst weapon with tickets so I decided to fully build her. Previously, I only had her 15cp and 35cp so never really got to use her when she got her Ex and Ex+. 

Only got her Ex from the protagonist Ex token shop we had, and the only reason I got hers was because she was the only one there that I didn’t already have and I wanted to sell her fully MLB’d 35cp weapon already. But I still didn’t use her even after getting her Ex since she was already outdated and powercrept by then.

Now that I have her Burst and LD, I Purpled her Ex and completed all of her Boards and bought her Bloom Stone and High Armor. The only thing I didn’t bother to get for her was her World of Illusions weapon because it’s useless. Also spent some time farming triple of her perfect Artifacts:

  • Buff Attack Boost All★★

Raises party’s MAX BRV, ATK by 10% with active buff

  • Charged Esuna Boost★★

Esuna use +1; raises MAX BRV by 40%

Even decided to go ahead and upgrade her High Armor to Blue.

To fully complete her, just need to figure out what Spheres to give to her.

Actual best or perfect Spheres for Yuna:

Yuna’s Sphere slots are C, C, and D. She’s a support slash healer slash buffer with pretty good auras and battery. She can deal decent enough damage as well.

Yuna’s High Armor is the one with the Encouragement’s Keystone affinity ability. One of its effects is that it increases the brave she grants to the party by 30%. Because of this, the perfect C Spheres for her are 2 of Paladin Cecil Harvey’s (from Final Fantasy IV) Full HP Break Hit BRV Gain All:

When inflicting Break or attacking target afflicted with Break while own HP at MAX:
• Grants party 5% of individual MAX BRV once per turn

As for Yuna’s D Sphere, anything that increases the party’s ATK is best. It’s even better if the Sphere can also increase the party’s MAX BRV. So the likes of Queen’s or Wakka’s D Spheres are perfect for Yuna.

Plans:

My Paladin Cecil is fully built, including his LD and BT, so I actually have one copy of his Sphere. Ever since I got it, it’s just been sitting in my inventory, unused since I didn’t really have anyone I wanted to give it to. 

Well now, I do want to give Yuna Spheres and this one’s perfect for her so, why not, right? The problem is what about her second C slot though? What other C Sphere should I give to her, or should I actually go ahead and Purple a dupe Cecil Ex just to get another Full HP Break Hit BRV Gain ALL C Sphere? Would it be worth it to do that? Maybe I could just give her another C Sphere or even just settle for giving her an RF Cecil Sphere. Well, definitely gonna need to think about this some more. 

Already gave Wakka’s Sphere to Galuf so that’s out unless I Purple another Wakka Ex. Queen’s event and banner happened already though and I was thankfully able to get multiple copies of her Ex. Purpled one of them already so I have one copy of Queen’s Sphere. 

What Actually Happened:

Welp, I actually did it. Yeah, that’s right, I Purpled a dupe Paladin Cecil Ex to get a second copy of his C Sphere. Then I proceeded to give both to Yuna. I finished it by equipping her with Queen’s Sphere.

She’s the first char I did this for. Purpled a dupe Ex for, I mean. No regrets so far though. Very pleased with her. She’s a really good support and she’s enabling my DPS to deal super special awesome damage. Hopefully, I can keep on using her for as long as possible.

Future plans:

No future plans since Yuna already has the perfect Spheres for her. Currently no plans of ever changing or switching them or something.

Conclusion

So, how ‘bout you? Have you decided to use your Spheres? Which chars did you give them to? Feel free to share your thoughts and opinions by leaving a comment below or by reblogging this post.

Notes:

  • pics are from Amazon.com; links shown above
  • screenshots are from my Dissidia Final Fantasy: Opera Omnia game account
  • originally published on my main Tumblr blog on Apr 15th, 2022 11:54:47pm